Showing posts with label Tech Tip. Show all posts

Friday, June 1, 2012

Some useful commands in Git

1) If You are interested in merging in the branch and want to see what commits are going to effect when we do that merge.

You can do this by putting a ^ in front of the branch that you don't want to see. 

$ git log --oneline branchname ^master

or

$ git log --oneline master ^branchname

2) To show stats for each commit
 
$ git log --stat

It lists which files were modified, how many lines added or deleted  

Tuesday, May 1, 2012

R.I.P - Flash

Adobe has officially announced the death of Flash on all mobile devices with immediate effect.

It will now concentrate on promoting HTML 5 technology among mobile app developer. HTML 5 will take over Flash functionality.

Thursday, March 22, 2012

Tricks to keep your Smart Phone’s battery run longer

If you’re a recent convert to smartphones, you would realize that smartphone's battery run shorter as compared to other phones. I was looking for some solution and came across this article in "The New York Times". It had some simple ideas which could help to get the most out of device's battery

1) Reconsider Your Network

The C.D.M.A. mobile standard used by Verizon uses more power than a G.S.M. network, principally used by AT&T and T-Mobile. If battery life is critical, you might want to consider G.S.M. as long as its coverage meets your needs.

2) Dim the brightness
Brighter your screen is, more battery will be drained.
For Iphone, Find it in Settings -> Brightness
 
3) Turn on Auto-Brightness
Turn Auto-Brightness on and you’ll save battery because your screen will need to use less power in bright places.
For Iphone, Find it in the Settings app -> Brightness -> Auto-Brightness On

4) Lower the volume
If you use your smartphone to play music, lower the volume.

5) Turn Off 3G
  Using 3G requires more battery life to get the quicker data speeds and higher-quality calls.If you need more battery, turn off 3G and just use the older, slower EDGE network. Your battery will last longer

6) Stop Searching
It is great that you can use Bluetooth technology to connect your smartphone to a headset, or use Wi-Fi to speed up the downloading of e-mail messages. But when you’re not using that headset or not near a Wi-Fi hot spot, turn off those features on the phone or laptop.
The reason is that portable devices will continue to look for Wi-Fi or a Bluetooth headset, using power.
Put your phone to sleep when it is in standby. On an iPhone, you do so through the “Settings” icon. On a BlackBerry, use the “Manage Connections” icon.

7) Turn off device’s mobile capabilities when in weak signal area
You’re in a weak signal area, your phone must work even harder to find one, decreasing battery life. If you know that there is no coverage in your area, turn off your portable device’s mobile capabilities.

If your G.S.M. 3G network is not available or the signal is weak, the battery will drain faster looking for one. Consider turning off the phone’s 3G network or using the slower EDGE network instead. It will make Web access slower but won’t affect phone call quality.

8) Check Mail Manually
Mobile smartphones can check for e-mail messages and instant messages automatically. Or they can be set to “push” notifications as soon as they arrive in your server’s mailbox.
Both strategies can be power hogs. To increase your battery life, turn off push and increase the interval between when the phone checks for new messages. Or better, set up your phone to check for messages manually.

9) Turn Off Everything
The simplest way to cut power to a minimum is to put your smartphone into “airplane mode.” In airplane mode and running just the alarm clock, your iPhone battery will last up to a week .

10) Get an App to Aid You
There are a number of applications that can help monitor battery life and shut off various functions that cut down on a mobile device’s effective power.
Battery Go and myBatteryLife tell iPhone owners how much charge they have left and how that power translates into minutes of talk time, music, video and Web surfing.
All batteries can be fully charged and discharged for a fixed number of cycles; lithium ion batteries typically last between 300 and 500 cycles. Information on the number of cycles can be obtained at manufacturers’ Web sites, or at batteryuniversity.com.
 

Wednesday, March 21, 2012

Revert in Git

1) If you have already committed your changes and want to “undo” the changes

git revert  $id

where $id is the commit id

This will create a second commit which undoes the changes of the given commit.

2)  Revert the last commit

git revert HEAD

3) Return to the last commited state

git reset --hard

Thursday, March 8, 2012

Tool to Convert Chinese characters to Unicode

Convert Chinese characters to Unicode

This tool will convert Chinese characters (and just about everything else, including Japanese hiragana, katakana, and kanji; tonal Hanyu Pinyin; and Cyrillic script) into the decimal (not hex) form of Unicode numerical character references (NCRs). These NCRs can then be used in Web pages, with greater ease than the Chinese characters themselves for those whose operating systems or other software don't handle double-byte text well.

You can see this tool here :

http://pinyin.info/tools/converter/chars2uninumbers.html

Git Cheat Sheet


Optimize performance on Git

Below Git is a distributed version control system, and is used to manage files. 
Below commands are very useful to optimize the performance on Git.
  • git status - This scans your working copy and git objects and gets some of that into the disk cache.It speeds up subsequent git operations.   
  • git gc - To garbage collect and compress your git repository. Git  perform this operation on its own when needed.

UTF-8 Encoding Tool

UTF-8 Encoding Tool

I found this tool really helpful for UTF-8 encoding especially  for Japanese and Chinese characters.

http://www.ltg.ed.ac.uk/~richard/utf-8.cgi

Wednesday, March 7, 2012

Usage of tar (file format) command in unix

tar(file format)

It is commonly used to collect many files into one larger file for distribution or archiving, while preserving file system information such as user and group permissions, dates, and directory structures.


Basic tar command only involve 5 options c, z, f, v, x
 
c = create a new tar file
v = verbose , display file to compress or uncompress
f = create the tar file with filename provided as the argument
z = use gzip to zip it
x = extract file


1) Compress / zip it with command tar -cvzf tarname.tar.gz folder
For example i want to compress and tar a folder name “abc”.

$ tar -cvzf abc.tar.gz abc
 
2) UnCompress it / unzip it with command tar -xzvf tarname.tar.gz
uncompress it or unzip abc.tar.gz.

$ tar -xvzf abc.tar.gz

Friday, February 24, 2012

How to open .chm files?

Right click on the .chm file > Properties > Click on Unblock button. Now try opening it.

Sunday, April 18, 2010

How to Install and Configure PHP 5 to Run with Apache on Windows

How to Install and Configure PHP 5 to Run with Apache on Windows

by Christopher Heng, thesitewizard.com
Many web developers want to run Apache and PHP on their own computer since it allows them to easily test their scripts and programs before they put them "live" on the Internet. This article gives a step by step guide on how you can install and configure PHP5 to work together with the Apache HTTP Server on Windows. The procedure has been tested to work on both Windows XP and Vista.
If you have not already installed Apache on your machine, check out one of the guides listed below. This "How To" guide assumes that you have already completed installing Apache.
Note: those planning to install PHP 4 on Apache 1.x should read my article How to Install and Configure PHP4 to Run with Apache on Windows instead.

Steps to Setting Up PHP 5

  1. Download PHP 5

    Before you begin, get a copy of PHP 5 from the PHP download page. In particular, download the VC6 thread-safe zip package from the "Windows Binaries" section — that is, don't get the installer. For example, select the package labelled "PHP 5.2.5 zip package" if 5.2.5 is the current version.
    [Update: note that I have not tested the procedure below with any of the PHP 5.3 versions, only with 5.2.5, which was the latest version at the time I originally wrote this. In theory, the procedure should work with later 5.2 versions as well. I'm not sure about 5.3 though. A version jump from 5.2 to 5.3 usually means bigger changes than simple bug fixes. If you want to be sure the procedure below will work, just get the latest of the 5.2 series.]
  2. Install PHP 5

    Create a folder on your hard disk for PHP. I suggest "c:\php" although you can use other names if you wish. Personally though, I prefer to avoid names with spaces in it, like "c:\Program Files\php" to avoid potential problems with programs that cannot handle such things. I will assume that you used c:\php in this tutorial.
    Extract all the files from the zip package into that folder. To do that simply double-click the zip file to open it, and drag all the files and folders to c:\php.
  3. Upgraders: Remove the Old PHP.INI File from Your Windows Directory

    If you are upgrading to PHP 5 from an older version, go to your windows directory, typically c:\windows, and delete any php.ini file that you have previously placed there.
  4. Configuring PHP

    Go to the c:\php folder and make a copy of the file "php.ini-recommended". Name the new file "php.ini". That is, you should now have a file "c:\php\php.ini", identical in content with "c:\php\php.ini-recommended".
    Note: if you are using Apache 1, you should either move the php.ini file to your windows directory, "C:\Windows" on most systems, or configure your PATH environment variable to include "c:\php". If you don't know how to do the latter, just move the php.ini file to the "c:\windows" folder. You do not have to do this if you are using Apache 2, since we will include a directive later in the Apache 2 configuration file to specify the location of the php.ini file.
    Use an ASCII text editor (such as Notepad, which can be found in the Accessories folder of your Start menu) to open "php.ini". You may need to make the following changes to the file, depending on your requirements:
    1. Enable Short Open Tags

      Search for the line that reads:
      short_open_tag = Off
      If short_open_tag is set to "off", tags like "commercial web hosts that support PHP have no issues with your scripts using "
      short_open_tag = On
    2. Magic Quotes

      By default, input data is not escaped with backslashes. That is, if your visitors enter an inverted comma (single quote) into your web form, the script will receive that unadorned inverted comma (single quote). This is for the most part desirable unless you special requirements. If you want your input data to have the backslash ("\") prefix, such as, for example, to mimic your web host's settings, search for the following:
      magic_quotes_gpc = Off
      and replace it with:
      magic_quotes_gpc = On
      Do not do this unless your web host has this setting as well. Even with the setting of "Off", you can still use the addslashes() function in PHP to add the slashes for the specific pieces of data that need them.
    3. Register Globals

      A number of older scripts assume that all data sent by a form will automatically have a PHP variable of the same name. For example, if your form has an input field with a name of "something", older PHP scripts assume that the PHP processor will automatically create a variable called $something that contains the value set in that field.
      If you are running such scripts, you will need to look for the following field:
      register_globals = Off
      and change it to the following:
      register_globals = On
      WARNING: Do NOT do this unless you have third party scripts that need it. When writing new scripts, it's best to always code with the assumption that the register_globals item is set to "Off".
    4. Display Errors

      On a "live" website, you typically want errors in your script to be silently logged to a PHP error file. On your own local machine, however, while you are testing and debugging a PHP script, it is probably more convenient to have error messages sent to the browser window when they appear. This way, you won't miss errors if you forget to check the error log file.
      If you want PHP to display error messages in your browser window, look for the following:
      display_errors = Off
      And change it to:
      display_errors = On
      This value should always be set to "Off" for a "live" website.
    5. Session Path

      If your script uses sessions, look for the following line:
      ;session.save_path = "/tmp"
      The session.save_path sets the folder where PHP saves its session files. Since "/tmp" does not exist on Windows, you will need to set it to a directory that does. One way is to create a folder called (say) "c:\tmp" (the way you created c:\php earlier), and point this setting to that folder. If you do that, change the line to the following:
      session.save_path = "c:\tmp"
      Notice that in addition to changing the path, I also removed the semi-colon (";") prefix from the line.
      Alternatively, you can find out the current TEMP folder on your computer and use that. Or create a "tmp" folder in your PHP directory, like "c:\php\tmp" and set the configuration file accordingly. The possibilities are endless. If you can't decide, just create "c:\tmp" and do as I said above.
    6. SMTP Server

      If your script uses the mail() function, and you want the function to successfully send mail on your local machine, look for the following section:
      [mail function]
      ; For Win32 only.
      SMTP = localhost
      smtp_port = 25

      ; For Win32 only.
      ;sendmail_from = me@example.com
      Change it to point to your SMTP server and email account. For example, if your SMTP server is "mail.example.com" and your email address is "youremail@example.com", change the code to:
      [mail function]
      SMTP = mail.example.com
      smtp_port = 25
      sendmail_from = youremail@example.com
      Note that after you do this, when your script tries to use the mail() function, you will need to be connected to your ISP for the function to succeed. If you do not modify the above lines and attempt to use mail() in your script, the function will return a fail code, and display (or log) the error (depending on how you configure php.ini to handle errors).
      (Note that in Apache 1.x, the smtp_port line may not be present. If so, don't include it.)

How to Configure Apache for PHP 5

There are two ways to set up Apache to use PHP: the first is to configure it to load the PHP interpreter as an Apache module. The second is to configure it to run the interpreter as a CGI binary. I will supply information for how you can accomplish both, but you should only implement one of these methods. Choose the module method if your web host also installed PHP as an Apache module, and use the CGI method if they have implemented it to run as a CGI binary.
  1. Running PHP 5 as an Apache Module

    To configure Apache to load PHP as a module to parse your PHP scripts, use an ASCII text editor to open the Apache configuration file, "httpd.conf". If you use Apache 1.x, the file is found in "c:\Program Files\Apache Group\Apache\conf\". Apache 2.0.x users can find it in "C:\Program Files\Apache Group\Apache2\conf\" while Apache 2.2.x users can find it in "C:\Program Files\Apache Software Foundation\Apache2.2\conf\". Basically, it's in the "conf" folder of wherever you installed Apache.
    Search for the section of the file that has a series of "LoadModule" statements. Statements prefixed by the hash "#" sign are regarded as having been commented out.
    If you are using Apache 1.x, add the following line after all the LoadModule statements:
    LoadModule php5_module "c:/php/php5apache.dll"
    If you are using Apache 2.0.x, add the following line after all the LoadModule statements:
    LoadModule php5_module "c:/php/php5apache2.dll"
    If you are using Apache 2.2.x, add the following line instead:
    LoadModule php5_module "c:/php/php5apache2_2.dll"
    Note carefully the use of the forward slash character ("/") instead of the traditional Windows backslash ("\"). This is not a typographical error.
    If you are using Apache 1.x, search for the series of "AddModule" statements, and add the following line after all of them. You do not have to do this in any of the Apache 2 series of web servers.
    AddModule mod_php5.c
    Next, search for "AddType" in the file, and add the following line after the last "AddType" statement. Do this no matter which version of Apache you are using. For Apache 2.2.x, you can find the "AddType" lines in the section. Add the line just before the closing for that section.
    AddType application/x-httpd-php .php
    If you need to support other file types, like ".phtml", simply add them to the list, like this:
    AddType application/x-httpd-php .phtml
    Finally, for those using one of the Apache 2 versions, you will need to indicate the location of your PHP ini file. Add the following line to the end of your httpd.conf file.
    PHPIniDir "c:/php"
    Of course if you used a different directory for your PHP installation, you will need to change "c:/php" to that path. Remember to use the forward slash ("/") here again.
    If you are using Apache 1, you will have already placed your php.ini file in either the Windows directory or somewhere in your PATH, so PHP should be able to find it by itself. You can of course do the same if you are using Apache 2, but I find modifying the Apache configuration file a better solution than cluttering your c:\windows directory or your PATH variable.
  2. Running PHP 5 as a CGI Binary

    If you have configured PHP 5 to run as an Apache module, skip forward to the next section. This section is for those who want to configure PHP to run as a CGI binary.
    The procedure is the same whether you are using the Apache 1.x series or one of the 2.x series.
    Search for the portion of your Apache configuration file which has the ScriptAlias section. Add the line from the box below immediately after the ScriptAlias line for "cgi-bin". If you use Apache 2.2.x, make sure that the line goes before the closing for that section.
    Note that if you installed PHP elsewhere, such as "c:\Program Files\php\", you should substitute the appropriate path in place of "c:/php/" (for example, "c:/Program Files/php/"). Observe carefully that I used forward slashes ("/") instead of the usual Windows backslashes ("\") below. You will need to do the same.
    ScriptAlias /php/ "c:/php/"
    Apache needs to be configured for the PHP MIME type. Search for the "AddType" comment block explaining its use, and add the AddType line in the box below after it. For Apache 2.2.x, you can find the AddType lines in the section. Add the following line just before the closing for that section.
    AddType application/x-httpd-php .php
    As in the case of running PHP as an Apache module, you can add whatever extensions you want Apache to recognise as PHP scripts, such as:
    AddType application/x-httpd-php .phtml
    Next, you will need to tell the server to execute the PHP executable each time it encounters a PHP script. Add the following somewhere in the file, such as after the comment block explaining "Action". If you use Apache 2.2.x, you can simply add it immediately after your "AddType" statement above; there's no "Action" comment block in Apache 2.2.x.
    Action application/x-httpd-php "/php/php-cgi.exe"
    Note: the "/php/" portion will be recognised as a ScriptAlias, a sort of macro which will be expanded to "c:/php/" (or "c:/Program Files/php/" if you installed PHP there) by Apache. In other words, don't put "c:/php/php.exe" or "c:/Program Files/php/php.exe" in that directive, put "/php/php-cgi.exe".
    If you are using Apache 2.2.x, look for the following section in the httpd.conf file:

    AllowOverride None
    Options None
    Order allow,deny
    Allow from all
    Add the following lines immediately after the section you just found.

    AllowOverride None
    Options None
    Order allow,deny
    Allow from all
  3. Configuring the Default Index Page

    This section applies to all users, whether you are using PHP as a module or as a CGI binary.
    If you create a file index.php, and want Apache to load it as the directory index page for your website, you will have to add another line to the "httpd.conf" file. To do this, look for the line in the file that begins with "DirectoryIndex" and add "index.php" to the list of files on that line. For example, if the line used to be:
    DirectoryIndex index.html
    change it to:
    DirectoryIndex index.php index.html
    The next time you access your web server with just a directory name, like "localhost" or "localhost/directory/", Apache will send whatever your index.php script outputs, or if index.php is not available, the contents of index.html.

Restart the Apache Web Server

Restart your Apache server. This is needed because Apache needs to read the new configuration directives for PHP that you have placed into the httpd.conf file. The Apache 2.2 server can be restarted by doubleclicking the Apache Service Monitor system tray icon, and when the window appears, clicking the "Restart" button.

Testing Your PHP Installation

Create a PHP file with the following line:
Save the file as "test.php" or any other name that you fancy, but with the ".php" extension, into your Apache htdocs directory. If you are using Notepad, remember to save as "test.php" with the quotes, or the software will add a ".txt" extension behind your back.
Open your browser and access the file by typing "localhost/test.php" into your browser's address bar. Do not open the file directly on the hard disk - you'll only see the words you typed in earlier. You need to use the above URL so that the browser will try to access your Apache web server, which in turn runs PHP to interpret your script.
If all goes well, you should see a pageful of information about your PHP setup. Congratulations - you have successfully installed PHP and configured Apache to work with it. You can upload this same file, test.php, to your web host and run it there to see how your web host has set up his PHP, so that you can mimic it on your own machine.
If for some reason it does not work, check to see whether your PHP setup or your Apache setup is causing the problem. To do this, open a Command Prompt window (found in the "Accessories" folder of your "Start" menu) and run php-cgi.exe on test.php with a command line like "c:\php\php-cgi test.php" (without the quotes).
If invoking PHP from the command line causes a large HTML file with all the PHP configuration information to be displayed, then your PHP set up is fine. The problem probably lies with your Apache configuration. Make sure that you have restarted the Apache server after making configuration changes. Verify that you have configured Apache correctly by looking over, again, the instructions on this page and the steps given in How to Install and Configure Apache 1.x for Windows (for Apache 1.x users) or How to Install and Configure Apache 2 on Windows (for Apache 2.x users).

Wednesday, May 14, 2008

IIS IWAM and IUSR accounts

If your IIS applications aren’t working, it could be permissions relating to iusr and iwam accounts.
In order to add domain-based iusr and iwam, you’ll need to sync the passwords on the domain with the local accounts. How do you sync the password? First you need to know what password they’re using.
Apparently you can easily find the password that your iwam and iusr accounts are using the following method:
IIS provides a script file named Adsutil.vbs that you can use to obtain or set the passwords of the IUSR and IWAM accounts to or from the IIS metabase. In Windows NT 4.0, Adsutil.vbs is usually located in the \WINNT\System32\Inetsrv\Adminsamples folder. In Windows 2000, Adsutil.vbs is located in the \Inetpub\Adminscripts folder.
The following table lists the syntax for different functions of the Adsutil.vbs utility:
Function   /   Syntax
Obtain the IUSR account password  /
cscript.exe adsutil.vbs get w3svc/anonymoususerpass
Obtain the IWAM account password /
cscript.exe adsutil.vbs get w3svc/wamuserpass
Set the IUSR account password  /
cscript.exe adsutil.vbs set w3svc/anonymoususerpass "password"
Set the IWAM account password  /
cscript.exe adsutil.vbs set w3svc/wamuserpass "password"
Note :When you try to obtain the password in Windows NT 4.0, the password appears as clear text; however, the password appears as asterisks in Windows 2000. To obtain the password in clear text in Windows 2000, you must modify Adsutil.vbs so that it displays the unmasked password. To do this, follow these steps:
1. In Notepad, open Adsutil.vbs.
2. On the Edit menu, click Find, type IsSecureProperty=True,
and then click Find Next.
3. Change "IsSecureProperty = True" to
"IsSecureProperty = False".
4. Save the changes to Adsutil.vbs, and then close Notepad.

ASP.NET Prerequisites

To create ASP.NET applications, you must prepare your , the one you will be using to develop your applications. Everything you need is free. To start, your computer should run one of the following operating systems:
  • Microsoft Windows XP Professional (no Home Edition)
  • Microsoft Windows 2000 Server
  • Microsoft Windows Server 2003 (any version)
Also, you should (according to Microsoft, "must"; but you will see in our lessons that we will be using different browsers to test our pages) install the latest Internet Explorer browser. The minimum you should have is Internet Explorer 5.5 but, unless you have any particular reason, you should install the 6.0 version.
To support databases (even if you don't intend to create web-based databases), you must install MDAC 2.7 or later, which is a free download from the Microsoft web site. Normally, you may have MDAC installed already but just in case you need it...
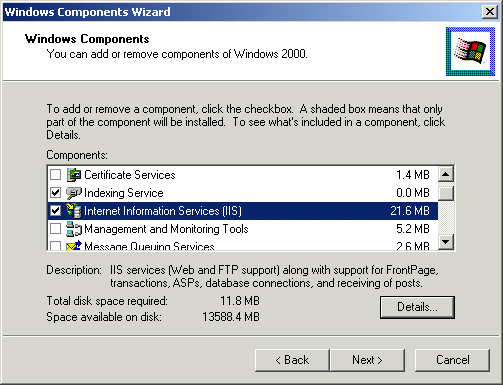
Along with one of the above operating systems, you must install Microsoft Internet Information Services (IIS) 6.0 or later. Normally, during the installation of the operating system, you would have been prompted to install it. Otherwise, you can install it from Control Panel -> Add/Remove Programs -> Add/Remove Windows Components -> Internet Information Services (IIS) and follow the steps:

Once the operating system and these components are ready, you must install the .NET Framework. It is likely to be installed already. If you want to check, you can open the Add/Remove Programs from Control Panel and you should see an entry for Microsoft .NET Framework:
You can also see its entry in the Start menu. If you don't have it already, you can download it (free) from the Microsoft web site at http://www.asp.net.
  1. Open the Inetpub folder, and find a folder named wwwroot
  2. Create a new folder, like "MyWeb", under wwwroot.
  3. Use a text editor to write some ASP code, save the file as "test1.asp" in the "MyWeb" folder
  4. Make sure your Web server is running - its status can be checked by going into the Control Panel, then Administrative Tools, and double-click the "IIS Manager" icon
  5. Open your browser and type in "http://localhost/MyWeb/test1.asp", to view your first ASP page

Tuesday, April 29, 2008

How do I reinstall TCP/IP in Windows XP?

  • These instructions are recommended for advanced users who are familiar with modifying Windows XP networking components.
  • You must log on to Windows with an account with computer administrator privileges
  • Click the Start button, and select Control Panel.
  • Click the Network and Internet Connections link.
  • Click the Network Connections link.
  • Right-click your network connection, and select Properties.
  • Click the Install button.
  • Select Protocol.
  • Click the Add button.
  • Click the Have Disk button.
  • In the Copy Manufactuer's Files From text box, type: c:\windows\inf
  • Click OK.
  • Select Internet Protocol (TCP/IP).
  • Click OK.
  • Close all open windows.
  • Restart your computer.

How to reset Internet Protocol (TCP/IP) in Windows XP

The NetShell utility (netsh) is a command-line scripting interface for
configuring and monitoring Windows XP networking. This tool provides
an interactive network shell interface to the user.

In Windows XP, a reset command is available in the IP context of the
NetShell utility. When you run the reset command, it rewrites pertinent
registry keys that are used by the IP (TCP/IP) stack to reach the same result
as the removal and the reinstallation of the protocol.
SYSTEM\CurrentControlSet\Services\Tcpip\Parameters\
SYSTEM\CurrentControlSet\Services\DHCP\Parameters\

Command usage


netsh int ip reset [log_file_name]
To manually run the command successfully, you must specify a file name for the log where actions that are taken by netsh will be recorded.

Warning Programs that access or monitor the Internet such as antivirus, firewall or proxy clients may be adversely affected when you run the netsh winsock reset command. If you have a program that no longer functions correctly after you use this resolution, reinstall the program to restore functionality.

Command samples


netsh int ip reset resetlog.txt
netsh int ip reset c:\resetlog.txt

IPCONFIG fails

If the following error occurs when attempting to run IPCONFIG:
Windows IP Configuration
An internal error occurred: A device attached to the system
is not functioning.Please contact Microsoft Product Support
Services for further help.
Additional information: Unknown media status code.
The likely cause of the problem is a wired network adapter that isn't connected.
IPCONFIG reports an error because of unknown media status from the wired network device driver.
This issue is known to affect at least some Intel wired network adapters with Windows XP drivers dated 2006 and later. For example, disconnected Intel PRO/1000 MT Mobile wired network adapter in a ThinkPad T41 with driver e1000325.sys:
Version Date Source Status IPCONFIG
6.4.16.36 06/13/2003 Original Windows XP driver Cable Unplugged OK
7.2.17.101 10/26/2004 Lenovo Software Installer Cable Unplugged OK
8.7.1.0 04/27/2006 Microsoft/Windows Update Auto Disable Fails
8.7.9.0 10/24/2006 Lenovo Driver Download Auto Disable Fails
8.9.1.0 03/25/2007 Microsoft/Windows Update Cable Unplugged Fails

Apparently this problem was introduced by Intel in Version 8 of its Windows XP drivers, possibly as an Law of Unintended Consequences of power management-related changes.
Note: Windows Vista does not seem to exhibit this problem with version 8 drivers.

Fix:
  • Use Windows XP Driver Roll Back or Uninstall/reboot/reinstall to go back to the original Windows XP driver, or otherwise install an older driver that doesn't exhibit this problem (e.g., Intel Version 7 rather than Version 8).
  • Hide any updated driver in Microsoft/Windows Update to prevent unintentionally recreating this problem in the future. Likewise avoid recent driver updates from hardware vendors.
Workarounds:
  1. (Verified)
    1. Click Start → Control Panel → Network Connections, and for any wired network adapters that are Disabled:
    2. Right-click on My Computer, and click Manage to start Device Manager
    3. Disable wired Network Adapters that are disabled in Network Connections
    4. Run IPCONFIG as desired
    5. Re-Enable wired network adapters in Device Manager
  2. (Verified)
    1. Click Start → Control Panel → Administrative Tools
    2. Double-click Services
    3. Scroll down to Routing and Remote Access
    4. If Routing and Remote Access is Disabled, change it to Manual
    5. Start Routing and Remote Access, or Stop and Re-Start it if it's already running
  3. (Not verified, applies to ThinkPads, possibly other computers)
    1. Uninstall Access Connections, Keyboard Customizer, Wi-Fi drivers, and Ethernet drivers
    2. Reinstall in this order Ethernet, Wi-Fi, Keyboard Customizer, Access Connections
Notes:
  1. Turning off Power Management and/or changing Advanced options doesn't help.
  2. The problem occurs whether or not the Intel PROSet for Windows Device Manager is installed.